Introduction to Rustic Italian Crusty Bread
Making bread at home is more than just following a recipe — it’s a joyful experience that connects you to centuries of tradition. When you dive into the world of homemade bread, you’ll find that there’s a unique satisfaction that comes with creating something from scratch. The aromas wafting through your kitchen as the bread bakes, the golden crust forming just right — it’s a sensory delight that store-bought bread simply can’t replicate. Homestyle baking often leads us to our roots, and rustic Italian crusty bread has that heartwarming, honest touch that makes it perfect for any meal.
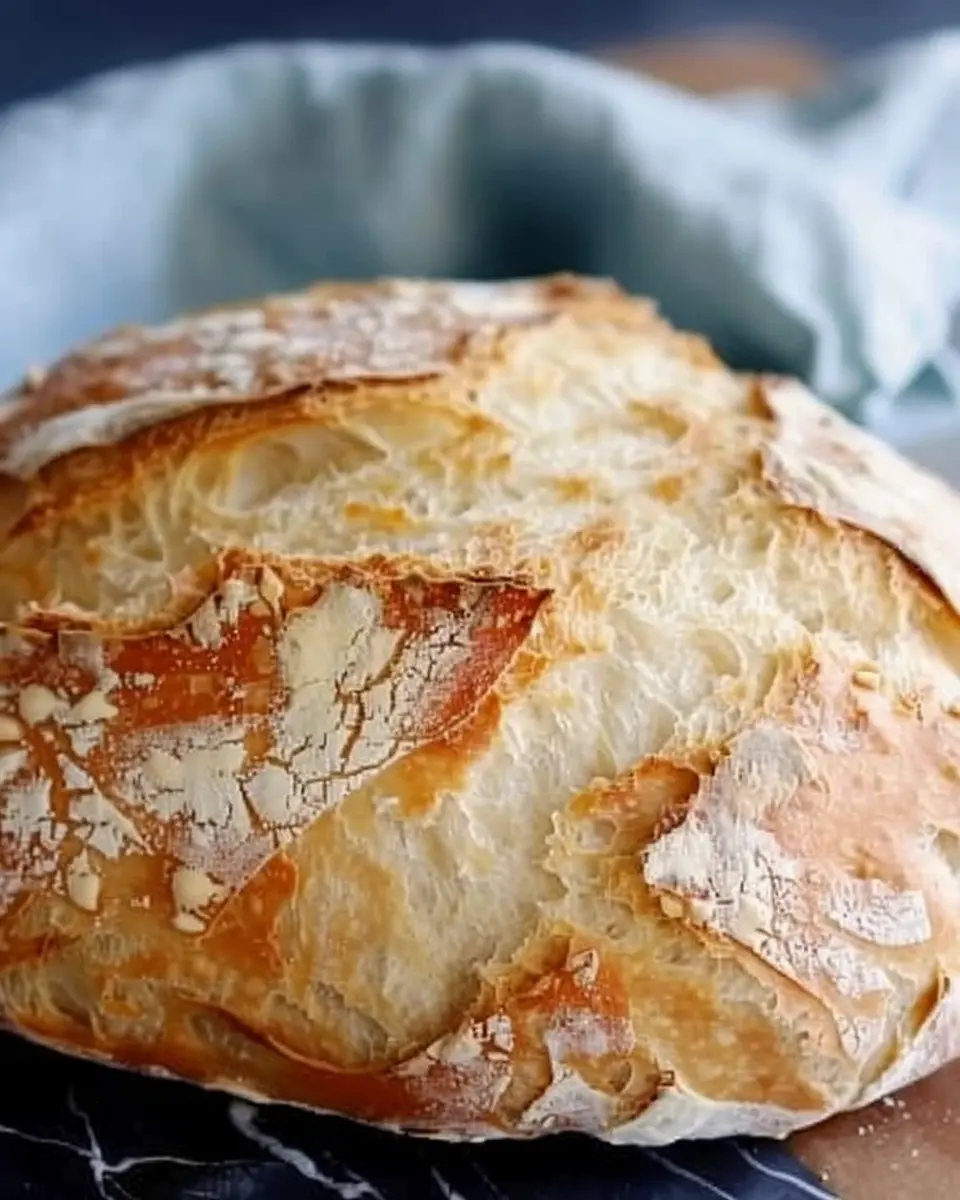
The Joy of Rustic Italian Flavors
So, what makes the flavors of rustic Italian bread so inviting? It’s all about simplicity and quality ingredients. Traditional Italian bread is usually made with just four core ingredients: flour, water, salt, and yeast. When combined, these components undergo a magical transformation, becoming a beautifully crusty loaf that embodies the rich culinary heritage of Italy.
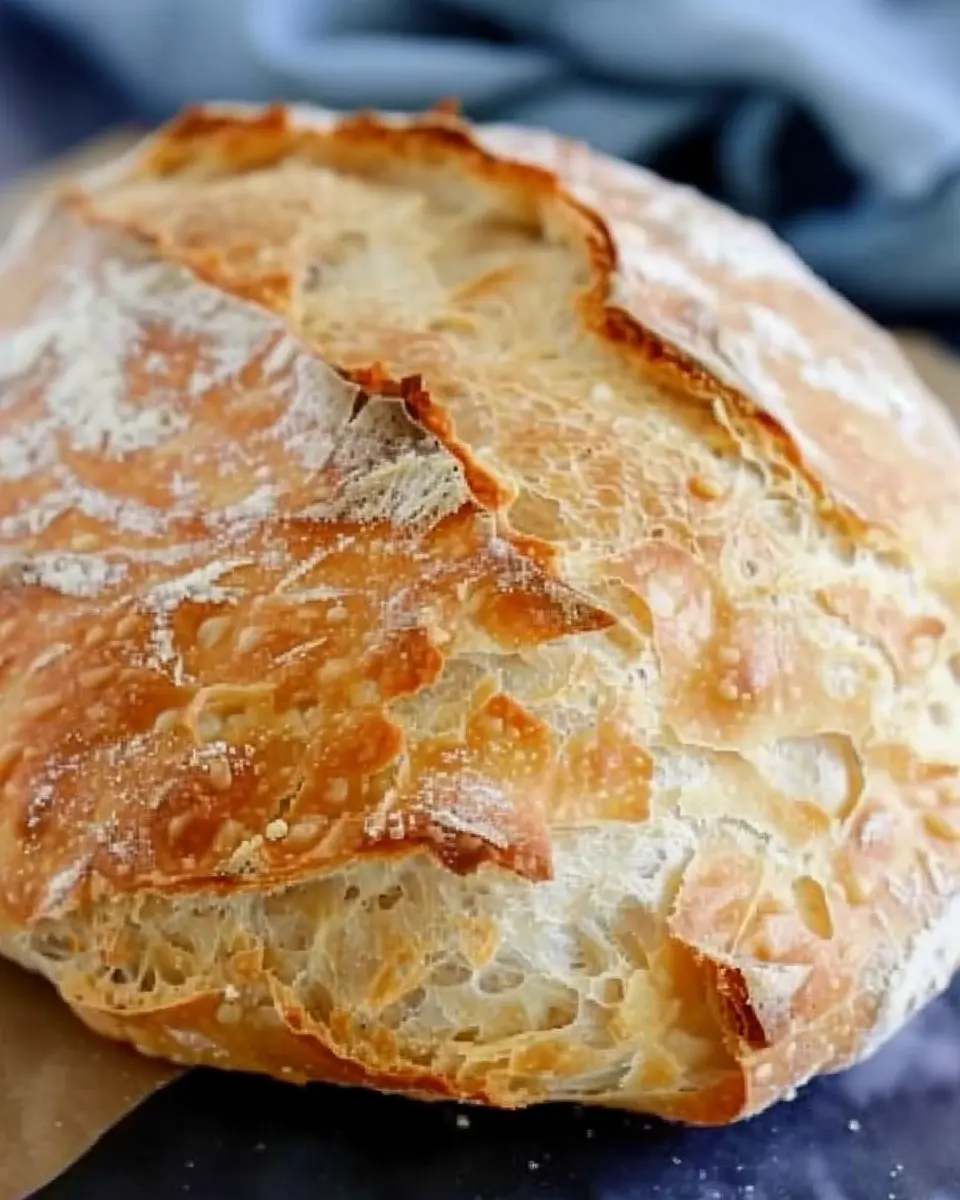
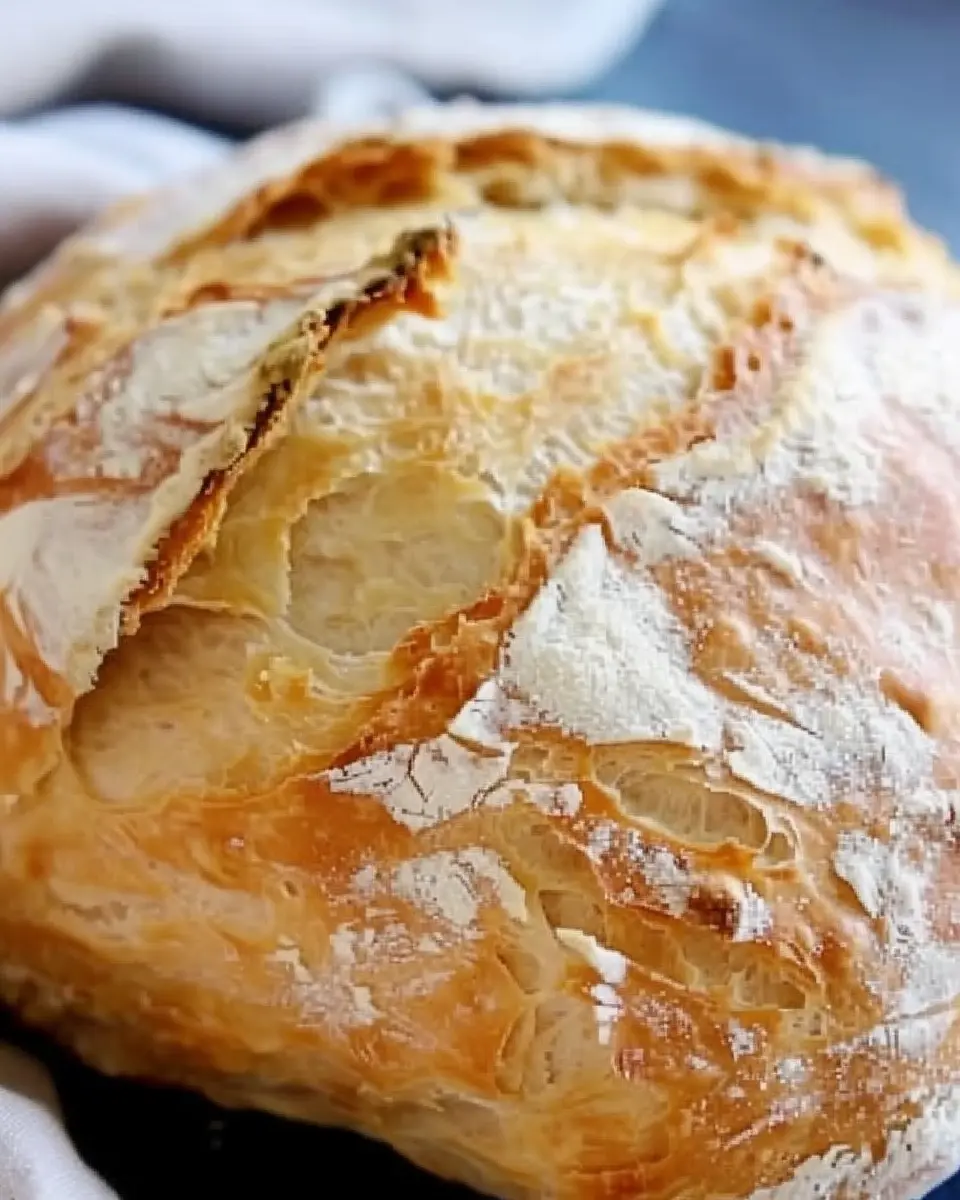
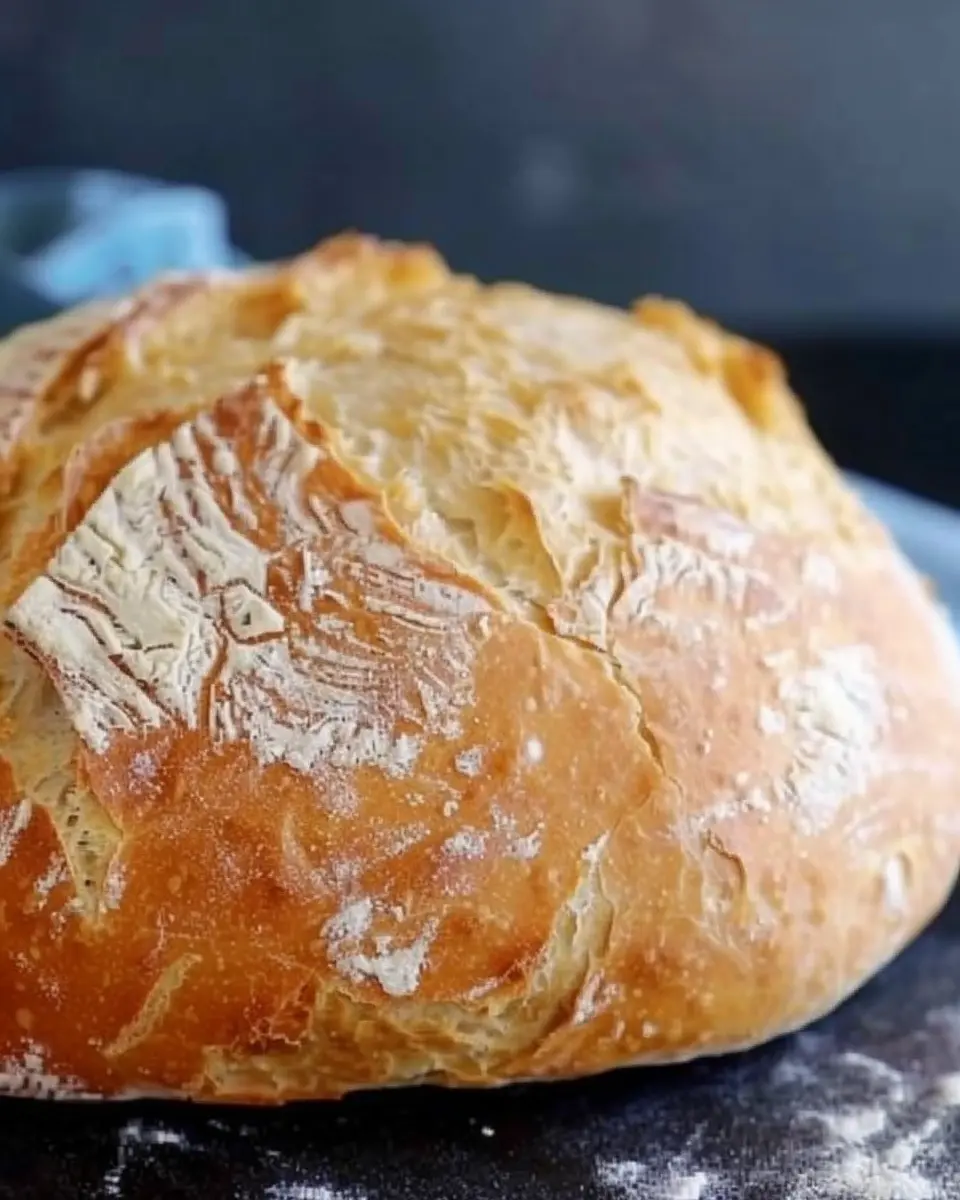
Imagine biting into a slice of this rustic Italian crusty bread. The crispy exterior gives way to a soft, chewy inside, providing the ideal canvas for toppings—whether you’re slathering on a bit of olive oil or pairing it with chicken ham or turkey bacon in a sandwich. The crispy crust is not just for show; it’s a hallmark of artisan bread-making and offers a satisfying crunch that elevates every bite.
Baking your own crusty bread can also be surprisingly easy! With techniques like the no-knead method, you can achieve that artisan-quality loaf with minimal effort. You don’t need to be a professional baker; you just need a bit of patience and a willingness to experiment in the kitchen.
If you’re curious to learn more about the nutritional benefits of homemade bread, check out this informative article on Bread Nutrition that highlights why embracing artisan bread can benefit your overall well-being.
So, gather your ingredients and prepare to embark on a culinary adventure with this rustic Italian crusty bread recipe. Your kitchen awaits the magic, and so do your taste buds!
Ingredients for Rustic Italian Crusty Bread
When it comes to baking a perfect loaf of bread, simplicity is key. The essential ingredients for your rustic Italian crusty bread recipe are likely already in your pantry, making this an accessible project for any young professional looking to impress friends and family.
Essential pantry staples
To get started, you’ll need:
- All-purpose flour: This forms the base of your bread.
- Salt: A crucial ingredient that enhances flavor and controls fermentation.
- Water: Filtered or room temperature is best.
- Yeast: Choose between active dry or instant yeast — both work wonders!
Remember: The quality of these ingredients will significantly impact your final product, so opt for fresher ingredients whenever possible. For a deeper dive into the nuances of bread-making ingredients, check out King Arthur Baking.
Quality matters: flour and yeast
Investing in premium flour and high-quality yeast can make a massive difference. According to experts, bread quality is often a reflection of its ingredients. Whole grains or bread flour can add flavor and protein, giving your crust an irresistible chew.
Also, keep an eye on your yeast’s expiration date. Using active yeast that’s still fresh ensures your bread rises beautifully. So next time you attempt this rustic Italian crusty bread recipe, think of it as a chance to elevate your cooking with top-notch ingredients!
Step-by-step preparation of Rustic Italian Crusty Bread
Making your own rustic Italian crusty bread is not just about the final product; it’s about the journey from unassuming ingredients to a loaf that’s as crusty on the outside as it is tender on the inside. Let’s dive into the preparation process, step by step!
Gather your ingredients
The magic of this bread begins with simple ingredients, which you may already have in your kitchen. Here’s what you’ll need:
- Flour: 3 cups of all-purpose flour works perfectly.
- Water: 1.5 cups, warm but not hot; aim for around 100°F (about 38°C).
- Yeast: 1 teaspoon of active dry yeast—this is essential for that lovely rise.
- Salt: 1.5 teaspoons, which helps to enhance flavor.
- Cornmeal: Optional, for dusting the Dutch oven, but it adds a rustic touch.
Having these ready makes the process straightforward and enjoyable. And if you want to explore more about flour types, check out the King Arthur Flour website for a deep dive.
Mix the dry ingredients
In a large mixing bowl, take your freshly gathered ingredients and combine the flour, yeast, and salt. It’s important to mix the dry ingredients well before introducing any liquids. This ensures that the yeast gets evenly distributed in the flour, leading to a more consistent rise. A whisk works wonderfully for this—just a few moments will do!
Create the sticky dough
Now comes the fun part—add the warm water to the dry mixture. Stir with a wooden spoon or your hands until the dough comes together. You’re aiming for a shaggy, sticky dough. Don’t worry if it feels too wet at first; that’s just right! Resist the urge to add more flour; the moisture is key to the characteristic rustic texture of your bread.
Let it rise
Cover the bowl with a clean kitchen towel or plastic wrap, and place it in a warm spot to rise. You want to let the dough rest for about 12-18 hours. Yes, you read that correctly! This long fermentation allows for the development of flavor and texture. While waiting, consider tackling some meal prep or binge-watching an episode of your favorite series—time flies when you’re having fun!
Prepare the Dutch oven
While your dough is rising, preheat your oven to 450°F (about 232°C) with a Dutch oven inside. This is crucial for creating that beautiful crust. Dust the bottom of the Dutch oven with cornmeal or line it with parchment paper to prevent sticking. If you’re wondering why the Dutch oven? It traps steam, mimicking a professional bread oven, which is essential for that crusty exterior.
Shape the dough
Once your dough has risen and doubled in size, gently deflate it on a floured surface—don’t knead! Just fold it over a few times to shape it into a ball. Next, place the shaped dough onto a floured cloth (or directly into the Dutch oven if you prefer) and let it rest again for about 30 minutes. This final rest allows the dough to puff up just enough.
Bake to perfection
Using oven mitts, carefully remove your hot Dutch oven from the oven. If you used a cloth, flip the dough into the pot (or slide the parchment with the dough onto the base). Cover it with the lid, and bake for 30 minutes. Then, remove the lid and bake for another 15-20 minutes, or until it’s deeply golden and sounds hollow when tapped. The aroma wafting through your kitchen will be irresistible!
Once out of the oven, let it cool on a rack before slicing. This helps set the crumb and enhances the flavor.
By embarking on this rustic Italian crusty bread recipe, you not only nourish your body but also connect to a beautiful culinary tradition. It’s amazing what you can do with just a handful of ingredients and a bit of patience!
Variations on Rustic Italian Crusty Bread
Additions to the Dough
One of the joys of baking this rustic Italian crusty bread recipe is how easy it is to customize. You can infuse your loaf with delicious flavors by simply adding a few ingredients to the dough. Consider mixing in:
- Herbs: Fresh rosemary, thyme, or oregano can elevate your bread’s aroma and taste.
- Cheese: Shredded Parmesan or crumbled feta adds a savory dimension that complements the crusty exterior.
- Olives or Sun-dried Tomatoes: These add a delightful, tangy burst, making each bite a little adventure.
Feel free to experiment and adjust the quantities based on your taste preferences. Remember, the beauty of artisan bread lies in its adaptability!
Using Different Flours
Another effective way to make your rustic Italian crusty bread stand out is by trying different flours. While conventional all-purpose flour works brilliantly, consider these options:
- Whole Wheat Flour: Adds nutty flavor and health benefits, making your bread a bit denser.
- Rye Flour: A unique choice that provides a distinct sour flavor, perfect for pairing with hearty toppings like turkey bacon and chicken ham.
- Gluten-Free Blends: If you’re avoiding gluten, many blends mimic the texture of traditional bread remarkably well. Be sure to check out sources like King Arthur Baking for specific mixes.
Experimenting with various flours not only personalizes your loaf but can also introduce new textures and flavors. Just think of the culinary possibilities! Who knows? You might discover your new favorite variation.
Cooking tips and notes for Rustic Italian Crusty Bread
Importance of temperature
When diving into your rustic Italian crusty bread recipe, remember that temperature plays a crucial role in achieving that perfect loaf. Ideally, the water you use should be warm (about 110°F or 43°C) to activate the yeast effectively. Using instant yeast can also make the process smoother. Additionally, consider the room temperature; a warmer environment encourages fermentation, while a cooler space might slow it down, which is fine if you have the time. Allowing the dough to rise slowly overnight in the refrigerator can deepen flavors significantly.
Avoiding gummy texture
No one wants a gummy loaf! To achieve that beautiful crust and airy crumb, it’s essential to maintain the right hydration levels. If your dough seems too wet, incorporate a little more flour when shaping—but don’t go overboard. Also, remember, letting your rustic Italian crusty bread rest on a floured surface helps eliminate stickiness. When baking, using a preheated Dutch oven can create steam, enhancing that delightful crust you’re after.
For more tips on bread-making techniques, check out Breadtopia. Happy baking!
Serving suggestions for Rustic Italian Crusty Bread
Pairing with dips and spreads
What’s better than a slice of rustic Italian crusty bread fresh from the oven? Pair it with delightful dips and spreads! You can dip your bread into:
- Extra virgin olive oil: Drizzle some high-quality olive oil on a plate and add a sprinkle of sea salt and freshly cracked pepper.
- Balsamic vinegar: A mix of balsamic vinegar and olive oil provides a tangy complement.
- Hummus: Creamy hummus adds a wonderful texture and flavor.
- Herbed butter: Whisk softened butter with herbs like basil, parsley, or rosemary for an aromatic treat.
These simple pairings elevate your meal and make each bite an experience.
Creative uses for leftover bread
Don’t let that delicious rustic Italian crusty bread go to waste! Here are a few clever ideas for using up leftovers:
- Bruschetta: Toast slices and top with diced tomatoes, garlic, and fresh basil for a classic appetizer.
- Breadcrumbs: Blitz leftover bread in a food processor to make fresh breadcrumbs for topping casseroles or adding to meat dishes.
- Panzanella: Create a refreshing salad mixing chunks of bread with ripe tomatoes, cucumbers, and a light vinaigrette.
The possibilities are endless! For more ideas, check out this great guide on bread leftovers from Serious Eats.
Time breakdown for Rustic Italian Crusty Bread
Preparation time
Getting started on your rustic Italian crusty bread recipe is a breeze! You’ll need about 15-20 minutes to mix your ingredients together. Just gather your flour, water, yeast, and salt for a simple yet fulfilling experience.
Rising time
The magic happens during the rising time, which takes approximately 12 to 18 hours. This slow fermentation process develops incredible flavor and texture, so don’t rush it! You can easily leave the dough to rise overnight, making it perfect for busy lifestyles.
Baking time
When you’re ready to enjoy your homemade bread, it’s time to bake! Expect about 30-40 minutes for baking at a high temperature. This is when your kitchen will be filled with that irresistible aroma!
Total time
In total, from start to finish, you’re looking at around 13 to 19 hours (mostly waiting for the dough to rise) before you can indulge in your delicious crusty bread.
By breaking down the time, you can plan your day more effectively, allowing you to enjoy this delightful bread fresh from the oven! Want to dive deeper into baking? Check out King Arthur Baking for more tips!
Nutritional facts for Rustic Italian Crusty Bread
When indulging in a slice of rustic Italian crusty bread, it’s good to know how it fits into your diet. Let’s break it down:
Calories per slice
Each slice of this delicious bread is approximately 80-100 calories, depending on thickness. It’s a satisfying and guilt-free addition to any meal!
Macronutrient breakdown
Understanding macronutrients can help you make informed choices. Here’s a simple overview per slice:
- Carbohydrates: 15-20g
- Protein: 3-5g
- Fat: 1g
This rustic Italian crusty bread recipe is primarily fueled by carbohydrates, making it a perfect companion for hearty soups or light salads. Want to explore more on the nutritional aspects of bread? Check out the USDA for further details.
While this crusty loaf may not claim to be a superfood, it offers a delightful balance that complements a variety of meals. Enjoy it fresh or toasted with olive oil for an Italian-inspired treat!
FAQs about Rustic Italian Crusty Bread
Can I make this bread gluten-free?
Absolutely! While the traditional rustic Italian crusty bread recipe relies on wheat flour, you can easily substitute with a gluten-free flour blend. Look for a mix that contains xanthan gum or add it separately to help mimic the elasticity of gluten. Just keep in mind that the texture and rise may differ slightly from the original, but it will still be deliciously crusty!
How do I store leftover bread?
Storing leftover rustic Italian crusty bread is straightforward. To preserve the crusty texture, wrap the loaf loosely in a clean kitchen towel or paper bag. Avoid plastic wrap as it can make the bread soggy. If you anticipate not finishing it within a few days, consider slicing it and freezing individual pieces. Just place them in an airtight container or freezer bag. When you’re ready to enjoy, they’ll be perfect for toasting or creating a delightful sandwich.
What’s the best way to reheat crusty bread?
Reheating your rustic Italian crusty bread to restore its delightful crust is easy! Preheat your oven to 350°F (175°C). Place the loaf directly on the oven rack for about 10-15 minutes. If you’re reheating slices, just pop them in for 5-7 minutes. This method brings back the crunch and warmth, making it ideal for serving with soups or spreads.
For more tips on the perfect bread storage and serving ideas, you can check out Serious Eats. Remember, great bread deserves great care!
Conclusion on Rustic Italian Crusty Bread
Your Invitation to Homemade Goodness
Embrace the art of bread-making with this easy, no-knead rustic Italian crusty bread recipe. Homemade bread not only fills your kitchen with warmth but also offers a unique flavor that store-bought loaves can’t compete with. Imagine pulling a golden-brown loaf from the oven, its crust crackling as you slice in. Pair it with a delicious olive oil for dipping, or use it to elevate your favorite sandwich!
Baking bread is about nourishing yourself and your loved ones. So, why not roll up your sleeves and enjoy this simple process? Trust me—it’s worth the effort! For more cooking tips and techniques, check out resources like King Arthur Baking for delicious ideas that complement your rustic loaf!
PrintRustic Italian Crusty Bread Recipe – Easy No-Knead Artisan Loaf

Learn how to make a delicious Rustic Italian Crusty Bread with this easy no-knead recipe that results in a perfect artisan loaf.
- Prep Time: 15 minutes
- Cook Time: 45 minutes
- Total Time: 18 hours
- Yield: 1 loaf 1x
- Category: Bread
- Method: No-Knead
- Cuisine: Italian
- Diet: Vegetarian
Ingredients
- 3 cups all-purpose flour
- 1 1/2 teaspoons salt
- 1/4 teaspoon instant yeast
- 1 1/2 cups warm water
Instructions
- In a large bowl, mix the flour, salt, and yeast together.
- Add warm water and stir until it forms a shaggy dough.
- Cover the bowl with plastic wrap and let it rest for 12 to 18 hours at room temperature.
- Turn the dough onto a floured surface and shape it into a ball.
- Preheat the oven to 450°F (232°C) with a Dutch oven inside.
- Carefully place the dough into the hot Dutch oven and cover.
- Bake for 30 minutes covered, then remove the lid and bake for another 15 minutes until golden brown.
- Let it cool on a wire rack before slicing.
Notes
- For best results, use a kitchen scale to measure ingredients.
- Feel free to add herbs or spices for extra flavor.
Nutrition
- Serving Size: 1 slice
- Calories: 150
- Sugar: 0g
- Sodium: 400mg
- Fat: 1g
- Saturated Fat: 0g
- Unsaturated Fat: 1g
- Trans Fat: 0g
- Carbohydrates: 30g
- Fiber: 1g
- Protein: 4g
- Cholesterol: 0mg
Keywords: rustic italian bread, no-knead bread, artisan loaf, easy bread recipe