Outline for Polar Bear Cookies Blog Post
When it comes to festive baking, there’s nothing quite as whimsical or delightful as creating polar bear cookies. These adorable treats can brighten up any holiday gathering or cozy night in! If you’re ready to dive into a delightful baking adventure, this outline will guide you through everything you need to know to make your very own batch of these charming cookies.
Introduction to Polar Bear Cookies
Let’s set the stage for your baking journey. Begin with a warm introduction that captures the joy of baking and sharing.
- Share your personal experience: What sparked your interest in making these cookies?
- Describe the appeal: Are they easy to make? Do they spark joy in both kids and adults?
Gather Your Ingredients
Before you can embark on this delicious quest, you need to know what ingredients you’ll need.
- List of key ingredients:
- Flour
- Sugar
- Butter
- Eggs
- Vanilla extract
- Baking soda
- Powdered sugar for decoration
- Chocolate chips for the eyes and nose
- Consider discussing alternatives: What can one substitute for common allergens or ingredient shortages?
- Provide useful links for sourcing quality ingredients, such as King Arthur Baking for flour or Amazon for specialty items.
Step-by-Step Recipe Instructions
Now comes the fun part – the actual recipe! Breaking it down into clear, concise steps will ensure that even novice bakers can follow along.
- Mixing the Dough:
- Start with the wet ingredients, then gradually incorporate the dry.
- Shaping the Cookies:
- Share tips for shaping them like adorable polar bears – any tricks to get the perfect rounded shape?
- Decorating with Frosting:
- Describe how to create that fluffy white coat using cream cheese frosting and tips for achieving the perfect snowy effect.
- Filling the Eyes and Nose:
- Discuss the best way to use chocolate chips to create those cute little faces.
Baking Tips for Perfect Polar Bear Cookies
To ensure successful baking results, share your tried-and-true techniques.
- Oven preheating and temperature tips. Did you know that even a few degrees can change the bake?
- Discuss baking time: Why is it crucial to keep an eye on your cookies?
- Mention common baking pitfalls to avoid: Overmixing the dough or forgetting to let it chill, for instance.
Enjoying and Sharing Your Cookies
Once your cookies are out of the oven and beautifully decorated, it’s time to enjoy them!
- Suggest ideas for serving: Perfect for a holiday party, or as a cheerful treat at an office gathering.
- Offer storage tips: Best practices for keeping your cookies fresh and tasty.
- Include ideas for gifting: Consider charming packaging ideas or sharing your cookies with neighbors (what a lovely gesture!).
Conclusion and Encouragement to Experiment
Wrap up the post by inviting your readers to try the recipe themselves.
- Encourage customization: Could they add flavors, like peppermint or spruce up the frosting with color?
- Ask readers for their feedback: Have they tried this recipe or a variation? What would they add?
- Include a gentle nudge to share their creations on social media with a unique hashtag you create for your blog.
Additional Resources
To enhance the experience further, provide links to related recipes or articles that support the theme, like:
- “How to Host a Cookie Decorating Party”
- “Winter Baking: Top 10 Cookie Recipes”
By following this outline for your polar bear cookies blog post, you’re setting yourself up for a delightful writing experience that resonates with your readers. Happy baking!
Introduction to Polar Bear Cookies
The Charm of Homemade Cookies
There’s something undeniably magical about the smell of homemade cookies wafting through your home. It’s a warm embrace that instantly transports you back to childhood memories—cookies fresh from the oven, sparkly eyes waiting for the first bite. Baking cookies is not just an act of creating delicious treats; it’s an exercise in love, patience, and creativity. Whether it’s sharing them with friends or delighting in a quiet moment alone with one (or three), homemade cookies bring joy that store-bought versions simply can’t match.
Why Polar Bears Make Adorable Treats
Speaking of unique homemade creations, have you ever considered the cuteness level of polar bear cookies? These whimsical treats aren’t just fun to bake; they also serve as a delightful way to celebrate special occasions or simply brighten a gloomy day. The soft, fluffy texture and snowy white icing mimic the gentle fur of a polar bear, making them irresistible. Plus, these cookies are versatile—you can customize their features to give them different expressions and personalities, which adds an element of fun to the baking process!
A Personal Anecdote on Baking and Nostalgia
Let me share a little personal story. Growing up, my family had a tradition of baking cookies together every winter. It started when I was just a kid, and I remember the excitement of racing downstairs, pajamas still on, to help my mom in the kitchen. We’d bake all sorts of cookies, but it was always the polar bear cookies that became a family favorite.
With each batch, we’d gather around the table, crafting little bear faces from icing and chocolate chips, laughing and reminiscing about the adventures we’d shared. That simple act of baking not only filled our home with warmth and sweetness but also anchored my deepest connections with my loved ones. As I continue this tradition in my own kitchen, crafting our family recipe for polar bear cookies serves as a meaningful reminder of those cherished times.
Whether it’s the delightful process or the joy of sharing, making polar bear cookies can easily become a heartfelt tradition for you and your loved ones. Ready to delight your taste buds and spark nostalgia? Let’s dive into the recipe!
Ingredients for Polar Bear Cookies
When it comes to creating delightful polar bear cookies, the secret lies in using the right ingredients. Let’s break them down for a successful baking experience.
Essential Ingredients for Soft-Batch Cookies
To achieve that soft, chewy texture in your polar bear cookies, you’ll need:
- All-purpose flour: Ensures your cookies have structure while remaining tender.
- Baking powder and baking soda: These leavening agents create the perfect rise.
- Butter: Use unsalted butter for the best flavor and a rich, creamy base.
- Granulated sugar & brown sugar: A mix of these gives that perfectly sweet taste and chewy texture.
- Eggs: Essential for binding the ingredients together.
- Vanilla extract: Just a splash enhances the overall flavor.
Key Ingredients for Buttercream Frosting
No polar bear cookie is complete without fluffy buttercream frosting. Here’s what you’ll need:
- Powdered sugar: This provides sweetness and a smooth texture.
- Butter: As with the cookies, softened unsalted butter delivers richness.
- Heavy cream or milk: For that ideal consistency, adding cream will give your frosting a nice sheen.
- Vanilla extract: A must for that classic frosting flavor.
Creative Decorations for the Bear Features
To bring your polar bear cookies to life, consider these fun decorating options:
- Mini chocolate chips: Perfect for eyes and noses.
- Candy melts: White and black options can be melted and piped for details.
- Shredded coconut: Adds a cute, snowy effect as a final touch.
By gathering these ingredients, you’ll be well on your way to baking the cutest and most delicious polar bear cookies that impress every time! For more cookie inspiration, check out resources from Sally’s Baking Addiction or Cookie and Kate. Happy baking!

Step-by-step Preparation of Polar Bear Cookies
Making polar bear cookies is not only a delightful baking project but also a creative way to bring a bit of winter magic to your kitchen. Whether you’re preparing for a holiday gathering or simply looking to enjoy a fun baking day, this step-by-step guide will help you create these adorable treats that everyone will love.
Preparing the Dough
The foundation of any good cookie starts with the dough. Here’s what you’ll need:
- 2 ¾ cups all-purpose flour
- 1 teaspoon baking powder
- ½ teaspoon baking soda
- ½ teaspoon salt
- 1 cup unsalted butter, softened
- 1 cup granulated sugar
- 1 large egg
- 2 teaspoons vanilla extract
To prepare the dough:
- In a medium bowl, whisk together the flour, baking powder, baking soda, and salt.
- In a large mixing bowl, cream the softened butter and granulated sugar until light and fluffy—this will take about 3 minutes.
- Add the egg and vanilla extract, mixing until well combined.
- Gradually incorporate the dry ingredients into your wet mixture, blending until you have a smooth dough.
Tip: Make sure not to overmix once the flour is added; otherwise, your cookies might turn out tough instead of tender!
Chilling the Dough for Best Results
After your polar bear cookie dough is ready, it’s essential to chill it. This step not only helps to firm up the dough but also makes it easier to handle and cut into shapes.
- Wrap the dough in plastic wrap or place it in an airtight container.
- Refrigerate for at least 1-2 hours (or overnight for best flavor).
Why chill? Well, chilling helps to ensure that your cookies maintain their shape while baking, giving you those perfectly adorable polar bear outlines.
Rolling and Cutting Out Polar Bear Shapes
Once your dough has chilled, it’s time to roll it out. Here’s how to get those cute shapes:
- Preheat your oven to 350°F (175°C).
- On a floured surface, roll out the chilled dough to about ¼-inch thickness.
- Use a polar bear cookie cutter (or a bear-shaped cookie cutter) to cut out your cookies, placing them on a parchment-lined baking sheet about two inches apart.
Remember to use some flour on your cutter to prevent sticking!
Baking the Cookies to Perfection
Baking is truly where the magic happens! Here’s how to do it right:
- Place your baking sheets in the preheated oven and bake for 8-10 minutes or until the edges are lightly golden.
- Keep a close eye—overbaking can lead to crunchy cookies instead of the soft, chewy ones we want.
One quick tip is to rotate your baking sheets halfway through for even baking. Let the cookies cool on the sheets for a few minutes before transferring them to wire racks to cool completely.
Making the Buttercream Frosting
While your polar bear cookies are cooling, it’s time to whip up some delicious buttercream frosting:
- 1 cup unsalted butter, softened
- 4 cups powdered sugar
- 2-3 tablespoons milk
- 1 teaspoon vanilla extract
- In a large bowl, beat the softened butter until creamy.
- Gradually add in the powdered sugar, mixing well.
- Incorporate the milk and vanilla extract until you reach your desired consistency.
Feel free to adjust the milk for a thicker or thinner frosting!
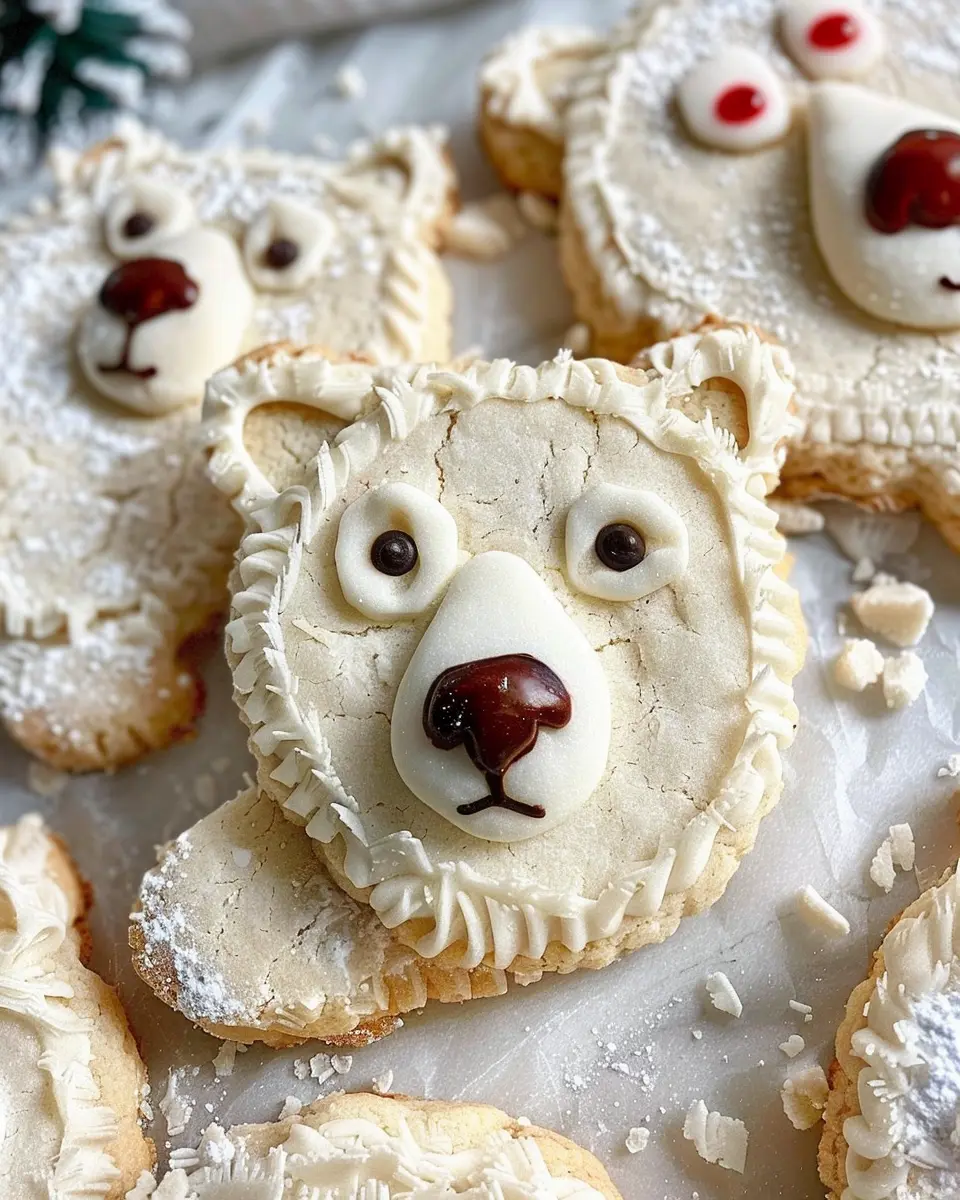
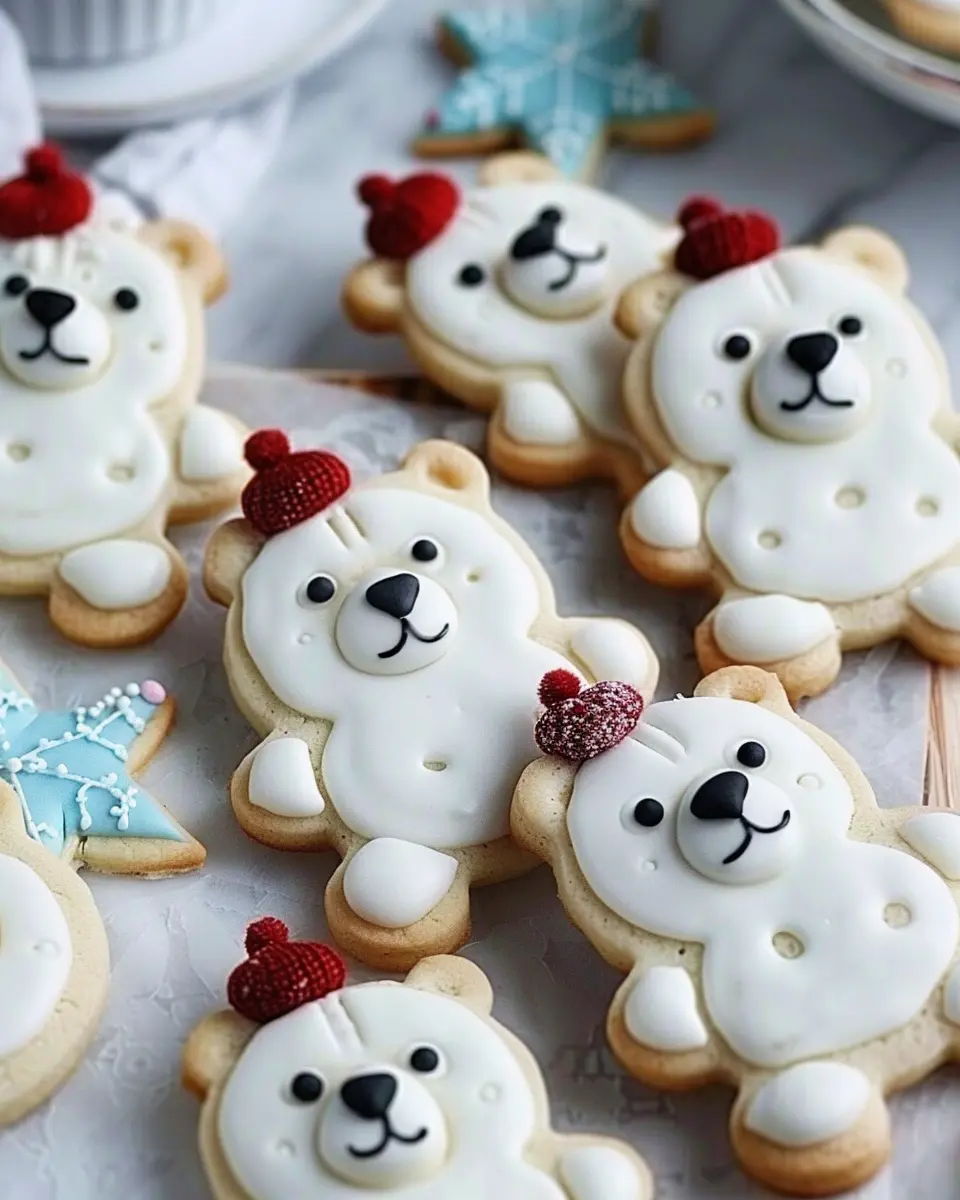
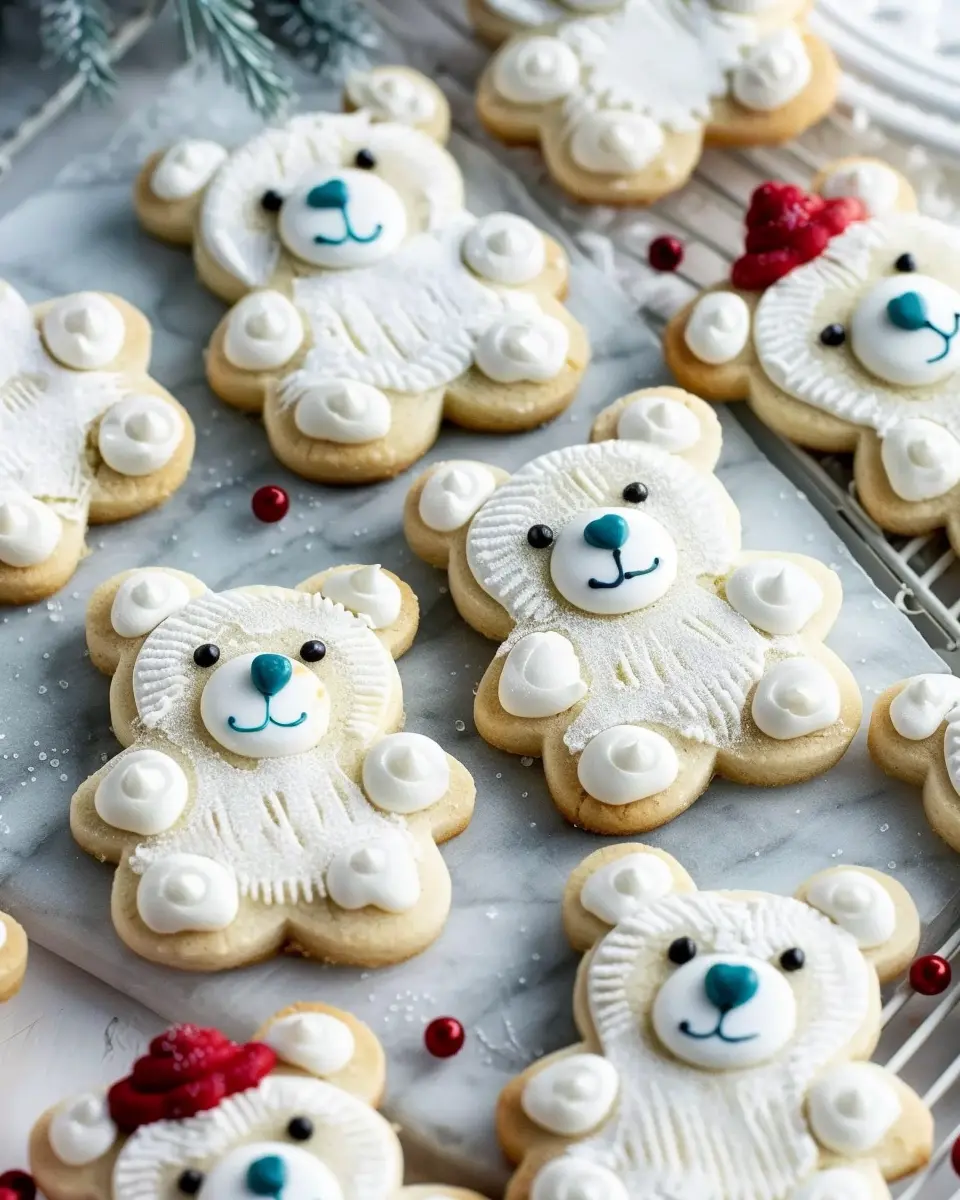
Decorating the Polar Bear Cookies
Now for the fun part—decorating your adorable polar bear cookies!
- Use a piping bag with a round tip to outline the shape of each bear with the frosting.
- Fill in the centers and use a spatula or knife to smooth the frosting.
- Add edible eyes, chocolate chips, and other decorations to create cute bear faces. Get creative!
Don’t be afraid to personalize your cookies. You can even use coconut flakes for a fluffy look or add colorful sprinkles for a festive touch.
In conclusion, making polar bear cookies is not just a recipe; it’s an opportunity to unleash your creativity and share warmth with friends and family. Enjoy the sweet rewards of your effort and perhaps even consider gifting them to someone special. Happy baking!
Variations on Polar Bear Cookies
Flavor Twists for Your Polar Bear Cookies
When you think of polar bear cookies, you’re probably envisioning those adorable little frosted treats. But have you ever considered adding a flavorful twist to elevate this classic? For a vanilla-forward cookie, how about swapping some of the plain flour with almond flour? Or if you’re a chocolate lover, incorporating cocoa powder into the dough can create a delightful chocolatey base that pairs beautifully with white frosting. And let’s not forget about spices! A pinch of cinnamon can give your cookies a warm and inviting aroma.
Creative Decoration Ideas
Decorating is half the fun! While a traditional polar bear vibe is charming, let your creativity run wild. Consider using colored icing to give each polar bear a unique personality. Add edible glitter for a frosty sparkle or even mini marshmallows for extra texture. You might also think about using nonpareils to create playful designs or incorporating coconut flakes to simulate snow. The more personal touches, the more memorable your cookies become. Not sure how to start? Check out this guide on cookie decorating techniques for ideas.
Unique Shapes with Different Cookie Cutters
Why limit yourself to standard polar bear shapes? Exploring various cookie cutters can add a fun twist to your baking. Think about using animal shapes like seals or even a snowflake for a winter theme! Each unique shape not only enhances the presentation but also sparks joy during the baking process. Consider making a mix of shapes for gatherings, so there’s something for everyone to enjoy.
By experimenting with polar bear cookies, you can create delightful variations that breathe new life into a beloved treat, making your baking adventures all the more exciting. Happy baking!
Cooking Tips and Notes for Polar Bear Cookies
Tips for Creating Soft and Chewy Cookies
To achieve those melt-in-your-mouth polar bear cookies, it’s essential to not overmix the dough once you add the dry ingredients. Mix just until combined, and consider slightly under-baking them. This way, they’ll continue to cook on the baking sheet and remain delightfully chewy!
Chilling Tips for Dough Success
Chilling your dough can make a world of difference. Refrigerate it for at least 30 minutes before baking. This step allows the flavors to mingle and helps the cookies maintain their shape in the oven, preventing them from spreading too much.
Frosting Consistency and Decorating Tips
For a perfect frosting consistency, aim for a thick yet spreadable texture—think peanut butter! If you want to achieve intricate designs, you might want to thin it slightly with a drop of milk. When decorating your polar bear cookies, use different colors of icing to create fun and charming designs, and don’t shy away from adding sprinkles for a festive touch!
Storage Tips for Longevity
Store your cookies in an airtight container at room temperature for up to a week. For longer storage, consider freezing them! Place the cookies in a single layer between sheets of parchment paper in an airtight container. They should stay fresh for up to three months, making them a great make-ahead treat for any occasion!
For more baking tips and delicious recipes, check out sites like King Arthur Baking or Serious Eats. Happy baking!
Serving Suggestions for Polar Bear Cookies
Ideas for Pairing Cookies with Beverages
When it comes to enjoying polar bear cookies, choosing the right beverage can enhance your experience. Here are some delightful pairings:
- Milk: A classic choice, whether it’s dairy or a nut-based alternative. The creaminess balances the sweetness of the cookies perfectly.
- Hot Chocolate: On a chilly day, dip your polar bear cookies into a warming cup of hot cocoa. Add some marshmallows for a cozy indulgence.
- Coffee or Tea: A rich, dark brew or a soothing herbal tea can offer a beautiful contrast, making it a delightful afternoon pick-me-up.
Looking for more creative drink ideas? Check out this fantastic guide on complementary beverages here.
Best Occasions for Serving These Cookies
Polar bear cookies are versatile and bring joy to many occasions. Here are just a few times when these delightful treats shine:
- Kids’ Parties: Their cute design is always a hit with the little ones, making them a fun addition to birthday celebrations.
- Holiday Gatherings: Whether it’s a winter holiday or a family reunion, these cookies add a whimsical touch to any dessert table.
- Cozy Evenings: Enjoy them while binge-watching your favorite series or hosting a game night with friends.
Their charming appeal and delicious taste make polar bear cookies the perfect choice for indulging in fond memories or creating new ones.
Time Breakdown for Polar Bear Cookies
Preparation Time
Making polar bear cookies is a delightful endeavor that starts with a bit of prep work. You’ll want to set aside about 20 minutes to gather your ingredients, mix the dough, and shape those adorable little bears. Creating that perfect cookie dough can be a fun task, especially if you’re multitasking with your favorite podcast or playlist in the background!
Baking Time
Once your adorable cookie shapes are ready, pop them into the oven. The baking process generally takes around 10-12 minutes. Keep a watchful eye though; you want that perfectly golden color—a happy medium between raw and crunchy!
Total Project Time
In total, you’re looking at just 30-35 minutes from start to finish for your polar bear cookies. This means you can soon relive your childhood memories of baking while sharing delicious treats with friends or family. Just imagine those happy faces when they see and taste your delightful creations!
For more baking tips, consider checking out The Joy of Baking or BBC Good Food for additional inspiration and recipes.
Nutritional Facts for Polar Bear Cookies
Calories per cookie
When it comes to enjoying polar bear cookies, moderation is key. Each cookie contains approximately 120 calories. This makes them a delightful treat without completely derailing your daily nutrition goals.
Key nutritional values
These adorable cookies pack some interesting nutritional elements, which include:
- Fat: 6 grams
- Sugar: 8 grams
- Carbohydrates: 15 grams
While the sugar content might seem higher, think of it as a fun treat to savor occasionally. For a smart choice, consider pairing your polar bear cookies with a warm cup of herbal tea or a glass of almond milk, both of which can offer some balance. If you want to dive deeper into the health benefits of sweets, check out Nutrition.gov for some eye-opening insights!
Remember, it’s all about balance. Enjoying a polar bear cookie now and then can bring joy to your day while still aligning with a healthy lifestyle.
FAQs about Polar Bear Cookies
What if I don’t have cream cheese?
Don’t sweat it! If you’re in a pinch and don’t have cream cheese on hand, you can easily substitute it with Greek yogurt. It provides a similar creaminess and tang that works well in the frosting for your polar bear cookies. Alternatively, you can blend mascarpone cheese for a rich twist. Just remember, the flavor and texture might vary slightly, but your cookies will still come out delicious.
Can I freeze these cookies?
Absolutely! Freezing polar bear cookies is a great way to save some for later. To freeze, simply let them cool completely, then place them in an airtight container or a zip-lock bag. If you want to keep the frosting intact, freeze them before frosting. When you’re ready to enjoy them, you can thaw them in the refrigerator overnight or leave them at room temperature for a couple of hours. This way, you’ll have sweet treats ready to go anytime you have a craving!
How do I add my twist to polar bear cookies?
Getting creative with polar bear cookies can be so much fun! Consider adding different flavor extracts, like vanilla or even a hint of almond for an unexpected taste. You could also mix in mini chocolate chips for little surprises in every bite. For decoration, try using colored sprinkles or edible glitter to match a theme or occasion. If you’re feeling adventurous, you might even try a different frosting flavor, like buttercream or whipped cream. Explore your culinary creativity and make these cookies uniquely yours!
For more baking inspiration, check out resources like King Arthur Baking for expert tips and techniques. And remember, the best part of baking is making it your own!
Conclusion on Polar Bear Cookies
The Joy of Homemade Cookies
There’s something truly magical about baking homemade cookies, and polar bear cookies are no exception. The delightful process—from mixing the dough to decorating the adorable polar bear faces—creates not just a delicious treat, but cherished memories with loved ones. According to a study by the American Bakers Association, baked goods can significantly boost well-being and social bonding. So, why not spread that joy with these charming cookies?
Try and Share the Experience
I wholeheartedly encourage you to try this fun recipe and put your unique spin on it—maybe with different designs or flavors. Share your creations on social media, tag your friends, or host a cozy cookie-decorating night. Your experience could inspire someone else to embark on their baking journey! Remember, every cookie baked is a step toward sweetening life’s moments. For more baking tips and fun ideas, visit Baking With Joy and get inspired!
PrintPolar Bear Cookies: Easy, Irresistibly Cute Treats for All
Make these adorable Polar Bear Cookies for any occasion! They’re simple to create and undeniably cute.
- Prep Time: 15 minutes
- Cook Time: 12 minutes
- Total Time: 27 minutes
- Yield: 24 cookies 1x
- Category: Dessert
- Method: Baking
- Cuisine: American
- Diet: Vegetarian
Ingredients
- 2 cups all-purpose flour
- 1 teaspoon baking powder
- 1/2 teaspoon salt
- 3/4 cup unsalted butter, softened
- 1 cup granulated sugar
- 1 large egg
- 1 teaspoon vanilla extract
- 1 cup powdered sugar
- 2 tablespoons milk
- Chocolate chips for decoration
Instructions
- Preheat your oven to 350°F (175°C).
- In a bowl, whisk together the flour, baking powder, and salt.
- In another bowl, cream the butter and sugar until light and fluffy.
- Beat in the egg and vanilla extract.
- Gradually add the dry ingredients to the wet mixture until combined.
- Roll the dough into balls and place them on a baking sheet lined with parchment paper.
- Bake for 10-12 minutes or until the edges are lightly golden.
- Let them cool completely.
- Mix the powdered sugar and milk to create a frosting.
- Decorate cookies with frosting and chocolate chips to make Polar Bear faces.
Notes
- Ensure the cookies are completely cool before decorating.
- Feel free to add different decorations for eyes and mouths.
Nutrition
- Serving Size: 1 cookie
- Calories: 120
- Sugar: 8g
- Sodium: 50mg
- Fat: 6g
- Saturated Fat: 4g
- Unsaturated Fat: 2g
- Trans Fat: 0g
- Carbohydrates: 16g
- Fiber: 0g
- Protein: 1g
- Cholesterol: 30mg
Keywords: Polar Bear Cookies, cute cookies, easy treats