
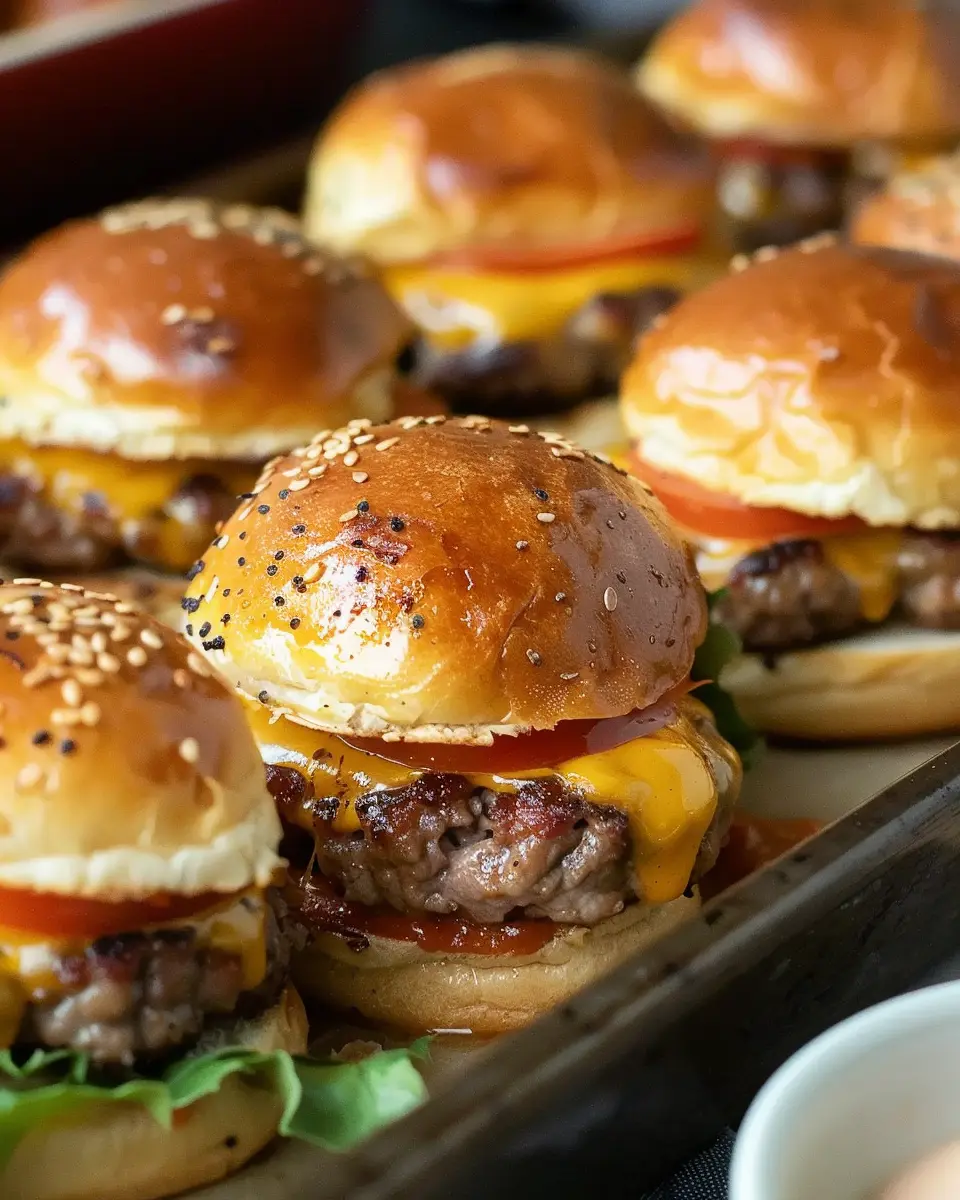
Introduction to Kid-Friendly Cheeseburger Sliders
If you’re looking for a meal that appeals to both kids and adults, Kid-Friendly Cheeseburger Sliders are an absolute winner! These mini burgers pack big flavors in a pint-sized package, making them perfect for little hands and eager appetites. But what is it about these sliders that makes them so universally loved? Let’s dig in!
What Makes Cheeseburger Sliders Perfect for Kids and Adults Alike?
First off, the sliders themselves are the ideal size for kids — they’re manageable, easy to hold, and encourage even the pickiest of eaters to dig in. You can customize them with an array of toppings, from classic American cheese to fresh veggies and special sauces, which means that every family member can create their unique masterpiece.
-
Versatility: Whether you want to keep it simple with just ketchup and cheese or go gourmet with caramelized onions and a rich, creamy sauce, there’s a combination for everyone. This versatility helps introduce kids to new flavors in a way that’s exciting rather than daunting.
-
Fun to Assemble: Kids love to be involved in the kitchen, and sliders are a fantastic way for them to participate in the cooking process. They can help form the patties, assemble their own sliders, and pick their favorite toppings. This hands-on experience not only fosters a love for cooking but can also make mealtime much more enjoyable.
-
Quick to Prepare: As busy young professionals, we appreciate meals that can be whipped up quickly without compromising flavor. Sliders can be prepared in about 30 minutes, allowing you to whip up something delicious even on a hectic weeknight.
Research shows that involving kids in cooking increases their likelihood of trying new foods. You can read more about these findings on the Academy of Nutrition and Dietetics’ website for insights on fostering healthy eating habits in children.
In summary, Kid-Friendly Cheeseburger Sliders are not just a fun and tasty meal option; they serve as a gateway for creativity and family bonding in the kitchen. So, whether it’s for a casual family dinner, a birthday party, or just a fun weekend treat, these sliders are sure to earn rave reviews around the dinner table!
Ingredients for Kid-Friendly Cheeseburger Sliders
Essential ingredients for delicious sliders
Creating Kid-Friendly Cheeseburger Sliders is easier than you might think! Here’s what you’ll need for these delightful bites:
- Ground Beef: 1 pound of lean ground beef is a must for the perfect juicy patty. Feel free to use grass-fed options for added flavor.
- Slider Buns: Look for soft, small buns or even mini brioche for a touch of sweetness.
- Cheese: Standard cheddar works wonders, but feel free to mix it up with mozzarella or American for an extra melty experience.
- Turkey Bacon: Crumbled turkey bacon adds a crispy, savory touch that kids love.
- Chicken Ham: If you’d like some additional protein, diced chicken ham is a great choice for flavor and texture.
- Condiments: Ketchup and mustard are classics, but consider mayo or BBQ sauce for variety.
Optional toppings and variations
To keep things exciting, your Kid-Friendly Cheeseburger Sliders can be dressed up with a variety of toppings. Think shredded lettuce, diced pickles, or even fresh tomato slices. Want to add a twist? Try avocado slices, jalapeños for a little kick, or a sprinkle of onion rings for crunch. The beauty of sliders is that they can be customized according to your kids’ tastes!
For a deep dive into more variations, check out Serious Eats for innovative topping ideas to keep your sliders fresh and fun at every meal!
Preparing Kid-Friendly Cheeseburger Sliders
When it comes to quick, satisfying meals that the kids will love, Kid-Friendly Cheeseburger Sliders are a fantastic choice. These little bites are not only fun to eat but also easy to prepare. Let’s walk through the steps to make your sliders a success!
Preheat and Prepare Your Baking Dish
First things first, let’s get that oven heating up! Preheat it to 350°F (175°C). While that’s warming, grab a 9×13-inch baking dish and lightly grease it with cooking spray or a little olive oil. This will keep your sliders from sticking and make cleanup a little easier later on. This is also a great time to gather all your ingredients, as having everything at hand will streamline your cooking process.
Brown the Ground Beef and Onions
In a medium skillet over medium heat, add about a pound of ground beef and half a cup of finely chopped onions. As the beef cooks, make sure to break it apart with a spatula to ensure it browns evenly. Cook it until the beef is no longer pink and the onions are soft—approximately 7-10 minutes. This not only gives your sliders flavor but also provides essential nutrients. Did you know ground beef is an excellent source of protein and iron? For those looking for healthier alternatives, consider turkey or chicken options. Check out resources from the USDA for nutritional facts to help guide your choices.
Slice and Prepare the Slider Buns
While the beef is cooking, it’s time to prepare the slider buns. Grab a pack of your favorite slider rolls—dinner rolls work perfectly—and slice them in half horizontally. Place the bottom halves in your greased baking dish. This is where the fun begins! Look for sliders with a fluffy texture, as they will soak up all the flavors without falling apart. If you want to make a kid-friendly twist, consider using whole wheat for added nutrition or even flavored buns, like garlic or onion, for an extra kick.
Assemble the Sliders Layer by Layer
Now comes the fun part: assembling your Kid-Friendly Cheeseburger Sliders! Start by spooning the beef and onion mixture evenly over the bottom buns, making sure to spread it out well. Top this with slices of your favorite cheese—American or cheddar are popular options, but feel free to get creative! A little tip: placing the cheese on top of the beef ensures it melts beautifully, creating a gooey, delicious layer. Finally, finish off with the tops of the buns. It’s like creating a tiny cheeseburger army ready for action!
Brush with Butter and Bake to Perfection
To add a touch of deliciousness, melt a couple of tablespoons of butter and mix in a bit of garlic powder or your favorite herbs. Brush this mixture over the tops of the slider buns. This not only adds flavor but also helps achieve that golden brown finish we all love. Place the baking dish in the oven and bake for about 15-20 minutes, or until the tops are golden and the cheese is melted. Your kitchen is about to smell divine!
Once they’re out of the oven, let them cool for just a minute. Serve them warm and watch the kids revel in their mini cheeseburger creations. Not only are these Kid-Friendly Cheeseburger Sliders a hit at family gatherings, but they’re also a perfect lunch option for the busy professional. Remember, cooking can be a joyful experience, so involve the kids in the preparation—let them help assemble the sliders for some quality family time.
So, are you ready to whip up a batch of these delicious sliders? Your taste buds will thank you!

Variations on Kid-Friendly Cheeseburger Sliders
When it comes to Kid-Friendly Cheeseburger Sliders, there are endless possibilities to delight both little ones and their grown-ups. Here are a few variations to consider that can cater to different tastes and dietary preferences.
Turkey or Chicken Sliders for a Lighter Option
If you’re looking to cut back on calories without sacrificing flavor, consider making sliders with ground turkey or chicken. Both meats are lean and provide the same satisfying texture as traditional beef sliders. Season with a blend of herbs and spices to elevate the flavor—thyme, garlic, and a hint of smoked paprika work wonders! Pair these with whole grain slider buns for a nutritious twist.
Veggie Sliders for Plant-Based Eaters
For those who prefer a plant-based approach, veggie sliders can be a hit! Combine black beans, quinoa, and finely chopped veggies to form a hearty patty. You can even experiment with lentils or chickpeas. These sliders are not just for vegetarians; they’re a fun way to sneak in more vegetables into your kids’ diets. Plus, they’re an opportunity for kids to help out in the kitchen—let them mash the beans or shape the patties!
Fun Twists Like Mini Pizza Sliders
Who doesn’t love pizza? Transform your sliders into mini pizzas by using pizza sauce, mozzarella cheese, and your choice of toppings on a small bun. This unique spin can make sliders even more appealing, especially for picky eaters. You could even create a “build-your-own” night where kids pick their favorite toppings!
These creative variations ensure that making Kid-Friendly Cheeseburger Sliders never gets boring, and everyone at the table leaves happy. For more inspiration, check out the American Heart Association for tips on heart-healthy meals your kids will love.
Cooking Tips and Notes for Kid-Friendly Cheeseburger Sliders
When whipping up delicious Kid-Friendly Cheeseburger Sliders, a few key tips can elevate your sliders and keep the whole family happy.
How to Avoid Soggy Buns
No one enjoys a slider with soggy buns sliding off the side! To keep your buns delightful and firm, consider these strategies:
- Toast Them: Lightly toast your buns in the oven or on a skillet for a few minutes before assembling. This creates a barrier that moisture can’t penetrate.
- Use a Layer: Spread a thin layer of mustard or mayonnaise on the buns before adding your patties. This acts as a protective barrier to moisture.
Best Cheese Options for Melty Goodness
Cheese is the heart of your Kid-Friendly Cheeseburger Sliders, so why not choose wisely? Some superb options include:
- Cheddar: Sharp or mild, it melts beautifully and adds great flavor.
- American: For that classic gooey melt that kids love!
- Mozzarella: A fun twist, offering a stretchy texture.
These choices not only enhance flavor but also create that fun, gooey texture that makes sliders a hit (learn more about blending flavors here)! Happy cooking!

Serving Suggestions for Kid-Friendly Cheeseburger Sliders
When it comes to making your Kid-Friendly Cheeseburger Sliders a hit, pairing them with the right side dishes can elevate the meal into something truly special. Here are some complementary options to create a well-rounded dining experience that your kids will love!
Complementary side dishes for a well-rounded meal
-
Sweet Potato Fries: These are a fantastic alternative to regular fries, offering a slightly sweet flavor and extra nutrients. You can make them crispy in the oven or air fryer for a guilt-free crunch.
-
Fruit Kabobs: Easy to eat and visually appealing, fruit kabobs made with a mix of grapes, melon, and strawberries add a fresh touch. Did you know that fruits like strawberries are packed with Vitamin C and antioxidants?
-
Garden Salad: A light garden salad with colorful veggies can be a great way to incorporate more greens. Toss in some cherry tomatoes, cucumbers, and a light vinaigrette for taste and nutrition.
-
Veggie Sticks with Hummus: For a crunchy option, serve carrot and cucumber sticks alongside creamy hummus. This combination not only satisfies hunger but also introduces your kids to healthy snacking habits.
By mixing and matching these sides, your Kid-Friendly Cheeseburger Sliders will not only taste great but also contribute to a balanced diet. With each bite, you’re helping them develop a palate for healthy meals!
For more vibrant veggie ideas, check out resources like the American Heart Association for inspiration.
Time Breakdown for Kid-Friendly Cheeseburger Sliders
Preparation time
Getting started is easy! You’ll need about 10 minutes to gather your ingredients and prep your toppings. Chopping veggies and mixing up the beef mixture doesn’t take long—just be sure to have everything ready for assembly.
Cooking time
Once you’re ready to cook, the sliders take approximately 15 minutes to bake in the oven. This is the perfect time to set the table or entertain your kids while the delicious aroma fills your kitchen.
Total time estimate
All in all, you can whip up these Kid-Friendly Cheeseburger Sliders in about 25 minutes. That’s a quick and satisfying meal for busy weeknights or cozy family gatherings! For tips on meal prepping and maximizing your kitchen efficiency, check out resources like The Kitchn.
Nutritional Facts for Kid-Friendly Cheeseburger Sliders
When it comes to quick and delightful meals, Kid-Friendly Cheeseburger Sliders are a winner! Here’s a closer look at their nutritional profile.
Approximate Calorie Count per Slider
Each slider comes in at around 200-250 calories, making them a satisfying yet light option for little appetites or snack time.
Protein and Nutritional Content Overview
Packed with protein, these sliders feature about 12-15 grams per serving, thanks to the juicy beef and a sprinkle of Turkey Bacon. Along with iron and essential vitamins, you’re serving up more than just a tasty treat.
For those interested in healthier choices, consider adding fresh veggies or swapping traditional buns for whole-grain alternatives. By optimizing these sliders with nutrient-dense ingredients, you can create a dish that the kiddos will love and parents will feel great about. For more tips on nutritious cooking, check out Nutrition.gov.
Frequently Asked Questions about Kid-Friendly Cheeseburger Sliders
Can I prepare these sliders in advance?
Absolutely! One of the best features of Kid-Friendly Cheeseburger Sliders is their flexibility. You can assemble them a few hours before serving. Just keep the sliders covered in the fridge until you’re ready to bake. If you’re making them for a big event, consider prepping the patties a day in advance. Cook them up, cool them down, and then store them in an airtight container. When it’s showtime, just pop everything in the oven, and you’ll have warm, delicious sliders in no time!
What are some good substitutes for cheese?
If your little ones are not fans of cheese—or if dietary restrictions come into play—there are plenty of fun alternatives! Consider:
- Nutritional yeast: This is a fantastic choice for a cheesy flavor without dairy.
- Vegan cheese: There are many brands available today that melt well and taste delightful.
- Avocado slices: Creamy and healthy, they pack flavor and good fats.
- Hummus: A spread that adds a unique flavor twist while keeping it healthy!
Finding the right substitute makes it easier to cater to your kids’ tastes.
How do I ensure these sliders are safe for lunchboxes?
To keep your Kid-Friendly Cheeseburger Sliders safe for lunch, consider these tips:
- Keep them cool: Use ice packs in lunchboxes to maintain a safe temperature.
- Wrap them well: A good wrapping can shield the sliders from contaminants and maintain freshness.
- Opt for whole ingredients: Using lean meats and whole-grain buns not only enhances nutrition but also keeps everything intact during transport.
Incorporating these simple strategies can ensure your sliders are not just tasty but also safe for your little ones!
For more tips on packing healthy lunches, check out resources from the Academy of Nutrition and Dietetics.
Conclusion on Kid-Friendly Cheeseburger Sliders
Why these sliders are a go-to recipe for families
Kid-Friendly Cheeseburger Sliders are not just another meal; they are a family favorite that brings everyone together. These sliders are quick to prepare and super fun for kids to assemble, making mealtime an interactive experience. With a mix of flavors from juicy beef patties and melted cheese to the crispy turkey bacon, each bite is deliciously satisfying.
Parents love them because they can sneak in veggies without the kids noticing. Plus, they are perfect for dinner or snacks during movie nights! For family meal inspiration, check out resources like EatingWell or Family Table. Enjoy creating amazing memories with these sliders at your next gathering!
PrintKid-Friendly Cheeseburger Sliders with Turkey Bacon Delight

These Kid-Friendly Cheeseburger Sliders with Turkey Bacon are perfect for a fun family dinner.
- Prep Time: 15 minutes
- Cook Time: 20 minutes
- Total Time: 35 minutes
- Yield: 12 sliders 1x
- Category: Dinner
- Method: Baking
- Cuisine: American
- Diet: Nut-Free
Ingredients
- 1 pound ground turkey
- 6 slices turkey bacon
- 1 cup shredded cheese
- 1/2 cup diced onions
- 1/4 cup ketchup
- 1 tablespoon mustard
- 12 slider buns
- Pickles (to taste)
Instructions
- Preheat the oven to 350°F.
- Cook the turkey bacon until crispy and chop into small pieces.
- In a bowl, mix ground turkey, bacon, cheese, onions, ketchup, and mustard.
- Form the mixture into small patties and place them on a baking sheet.
- Bake in the preheated oven for 20 minutes.
- Assemble sliders by placing each patty on a bun and adding pickles.
Notes
- These sliders can be customized with different toppings like lettuce or tomatoes.
Nutrition
- Serving Size: 2 sliders
- Calories: 250
- Sugar: 3g
- Sodium: 450mg
- Fat: 12g
- Saturated Fat: 3g
- Unsaturated Fat: 8g
- Trans Fat: 0g
- Carbohydrates: 29g
- Fiber: 1g
- Protein: 18g
- Cholesterol: 70mg
Keywords: Kid-Friendly, Cheeseburger, Sliders, Turkey Bacon